
A Step-By-Step Guide to Building Your Own Personal Blog, Part 2
With Next.JS, React.JS, TypeScript, Sanity.io, and TailwindCSS


Continue The Build
This build was split into two parts; Part 1 and this is Part 2, follow along to finish what we started.
Building The Post's Body Page
Create a post folder inside the pages folder, and inside post create a [slug].tsx file.
In order to link to the post's pages, using getStaticPaths() that lets Next.JS know which routes to pre-build. We need to fetch the slug (basically getting the IDs for all the posts you created) from sanity studio as such:
// Inside [slug].tsx at the bottom

export const getStaticPaths = async () => {
 const query = `*[_type == 'post']{
       _id,
      slug {
       current
     }
     }`;

 const posts = await sanityClient.fetch(query);

 // To figure out the paths and provide them to Next.JS. We provide them within an array whereby each object has a key called params, which would have the actual path inside of it:
 const paths = posts.map((post: Post) => ({
   // This means I'm going to directly return an object
   // The first one:
   params: {
     // The second one; is going to be the params that matches up to [slug]
     slug: post.slug.current,
   },
 }));

 return {
   paths,
   // This will block the page from not showing or showing a 404 if it doesn't exist
   fallback: "blocking",
 };
};
So far we've told Next.JS which pages to prepare but we didn't tell it how to use the slug or ID to actually fetch that post'sbody. This can be resolved by using getStaticProps():
And the actual query we want to use for that is this:
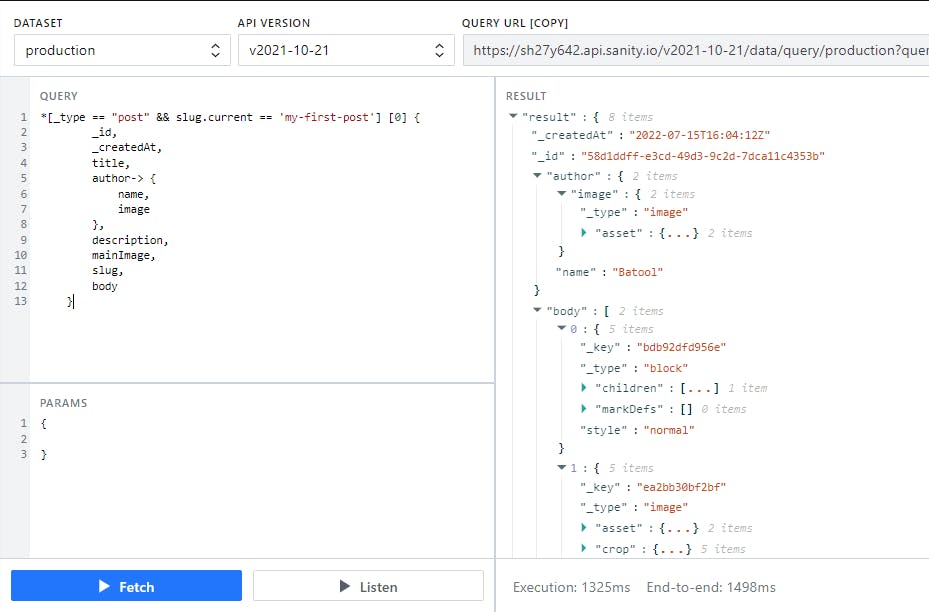
// Inside [slug].tsx at the very bottom

// This way we're getting the post information for each page
export const getStaticProps: GetStaticProps = async ({ params }) => {
 const query = `*[_type == "post" && slug.current == $slug][0]{
       _id,
       _createdAt,
       title,
       author-> {
           name,
           image
       },
       'comments' : *[_type == "comment" &&
         post._ref == ^._id &&
         approved== true],
       description,
       mainImage,
       slug,
       body
   }`;
 const post = await sanityClient.fetch(query, {
   slug: params?.slug,
 });

// For extra protection when actually fetching the post, if it doesn't exist or if it does, we add this:
 if (!post) {
   return {
     notFound: true,
   };
 }
 return {
   props: {
     post,
 };
};
To make sure it all works, after providing the slug paths and telling Next.JS which pages to show and what of their information to display, we'll do this in the Post function:
// Inside [slug].tsx

interface Props {
   post: Post
 }

function Post( {post}: Props) {
 return (
   <main>
       <Header />
   </main>
 )
}
if we were to console.log(post) we should be able to see the post's information if we visit this path with the slug--> localhost:3000/post/my-first-post
Now we're faced with another issue of not updating the cash. To fix it add this:
// Inside [slug].tsx, in GetStaticProps()

 return {
   props: {
     post,
   },
   revalidate: 60, // After 60 seconds, it will update the old cached version
 }
}
To build the posts' pages, we start by fetching each post's data from sanity studio:
Firstly, install and import:
npm i react-portable-text// Inside [slug].tsx interface Props { post: Post; } function Post({ post }: Props) { return ( <main> <Header /> {/* To render the post's title, description, main image, author's name and image, and when it was published */} <img className="object-cover w-full h-40" src={urlFor(post.mainImage).url()!} alt="" /> <article className="max-w-3xl p-5 mx-auto"> <h1 className="mt-10 mb-3 text-3xl">{post.title}</h1> <h2 className="mb-2 text-xl font-light text-gray-500"> {post.description} </h2> <div className="flex items-center space-x-2"> <img src={urlFor(post.author.image).url()!} className="w-10 h-10 rounded-full" /> <p className="text-sm font-extralight"> Blog post by{" "} <span className="text-blue-400"> {post.author.name} </span> - Published at {new Date(post._createdAt).toLocaleString()} </p> </div> <div> {/* To render the post's body */} <PortableText className="mt-10" dataset={process.env.NEXT_PUBLIC_SANITY_DATASET!} projectId={process.env.NEXT_PUBLIC_SANITY_PROJECT_ID!} content={post.body} serializers={{ h1: (props: any) => ( <h1 className="my-5 text-2xl font-bold" {...props} /> ), h2: (props: any) => ( <h2 className="my-5 text-xl font-bold" {...props} /> ), li: ({ children }: any) => ( <li className="ml-4 list-disc"> {children}</li> ), link: ({ href, children }: any) => ( <a href={href} className="text-blue-500 hover:underline"> {children} </a> ), }} ></PortableText> </div> </article> </main> ); } export default Post;
Adding Comments
It's time to add the API interaction using ReactHook to create a form for leaving comments on posts (push the comments to the database and render them on the post's page).
Install this on the terminal:
npm install react-hook-formImport this at the top of [slug].tsx:
import {useForm, SubmitHandler} from "react-hook-form"Define the form with TypeScript as such:
// Inside [slug].tsx

interface IFormInput {
 _id: string;
 name: string;
 email: string;
 comment: string[];
}
Add a function for when the form is submitted, where we use
<IFormInput>as a template to limit the form with having only the types in that are in<IFormInput>:// Inside [slug].tsx function Post({ post }: Props) { const { register, handleSubmit, formState: { errors }, } = useForm<IFormInput>();But as for the ID in
<IFormInput>, and because we don't have it in the actual form, we are going to do add in an invisible ID that takes some information inside of it, and the full form code becomes like this:// Inside [slug].tsx <form className="flex flex-col max-w-2xl p-5 mx-auto mb-10" > <h3 className="text-sm text-black">Enjoyed this article?</h3> <h4 className="text-3xl font-bold">Leave a comment below!</h4> <hr className="py-3 mt-2" /> <input {...register("_id")} type="hidden" name="_id" value={post._id} /> <label className="block mb-5"> <span className="text-gray-700"> Name </span> <input {...register("name", { required: true })} className="block w-full px-3 py-2 mt-1 border rounded shadow outline-none form-input ring-yellow-500 focus:ring" placeholder="Name" type="text" /> </label> <label className="block mb-5"> <span className="text-gray-700"> Email </span> <input {...register("email", { required: true })} className="block w-full px-3 py-2 mt-1 border rounded shadow outline-none form-input ring-yellow-500 focus:ring" placeholder="Email" type="email" /> </label> <label className="block mb-5"> <span className="text-gray-700"> Comment </span> <textarea {...register("comment", { required: true })} className="block w-full px-3 py-2 mt-1 border rounded shadow outline-none form-textarea ring-yellow-500 focus:ring" placeholder="Comment" rows={8} /> </label> {/* errors will return when field validation fails */} <div className="flex flex-col p-5"> {errors.name && ( <span className="text-red-500"> The Name is required</span> )} {errors.email && ( <span className="text-red-500"> The Email is required</span> )} {errors.comment && ( <span className="text-red-500"> The Comment is required</span> )} </div> <input type="submit" className="px-4 py-2 font-bold text-white bg-black rounded shadow cursor-pointer hover:bg-yellow-400 focus:shadow-outline focus:outline-none" /> </form>As regards to submitting and getting the form's data to the backend, we need ReactHook in handleSubmit:
// Inside [slug].tsx function Post({ post }: Props) { const { register, handleSubmit, formState: { errors }, } = useForm<IFormInput>(); } const onSubmit: SubmitHandler<IFormInput> = async (data) => { {/* We want to push the form data to sanity studio as a data type on schema, so I'll need to make a fetch to the API and parse and strignify the data from the form to push to the backend */} await fetch('/api/createComment', { method:'POST', body:JSON.stringify(data) }).then(()=> { console.log(data) }).catch((err) => { console.log(err) }) } }Don't forget to add the onSubmit attribute in the form:
<form onSubmit={handleSubmit(onSubmit)}Go to the api folder in pages and create a createComment.ts file, to create the API path ('/api/createComment'). First; make sure to install sanity client:
npm i @sanity/clientAnd add the following code to createComment.ts (we're going to modify it later):
// Inside createComment.ts

import type { NextApiRequest, NextApiResponse } from "next";
import sanityClient from "@sanity/client";

const config = {
 dataset: process.env.NEXT_PUBLIC_SANITY_DATASET,
 projectId: process.env.NEXT_PUBLIC_SANITY_PROJECT_ID,
 useCdn: process.env.NODE_ENV === "production",
 token: process.env.SANITY_API_TOKEN,
};

const client = sanityClient(config);

export default async function createComment(
 req: NextApiRequest,
 res: NextApiResponse
) {
 return res.status(200).json({ message: "comment submitted" });
}
As for the SANITY_API_TOKEN, go to your sanity account dashboard on your browser and click on this sanity project, then navigate to --> API --> Tokens and click on Add Api Token.
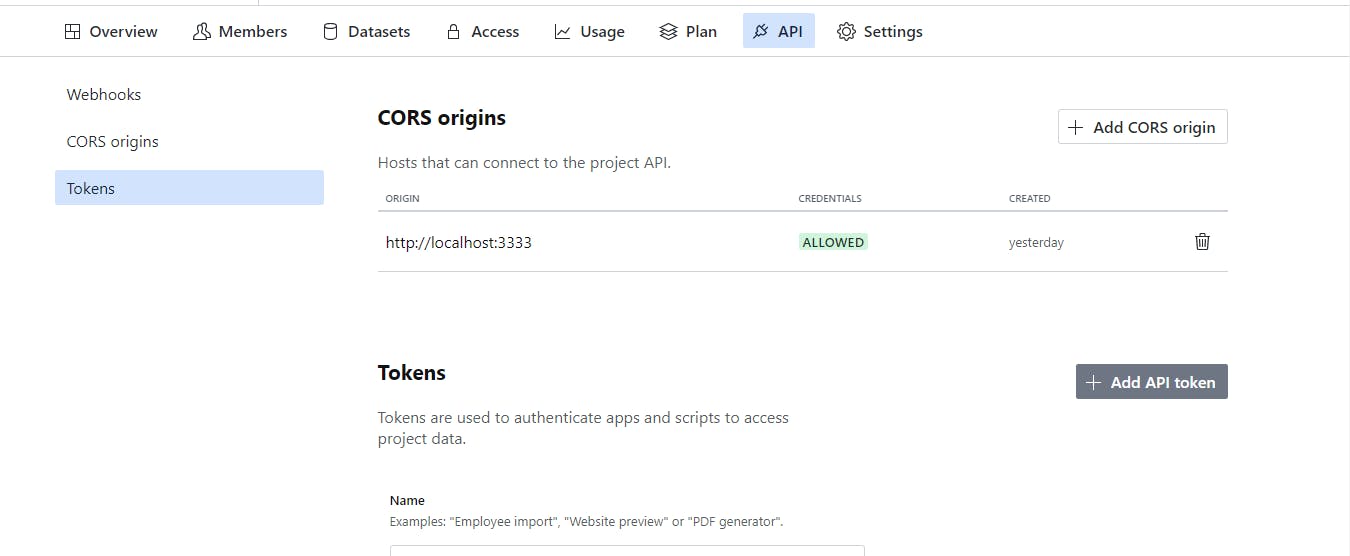
And follow up as the image below shows:
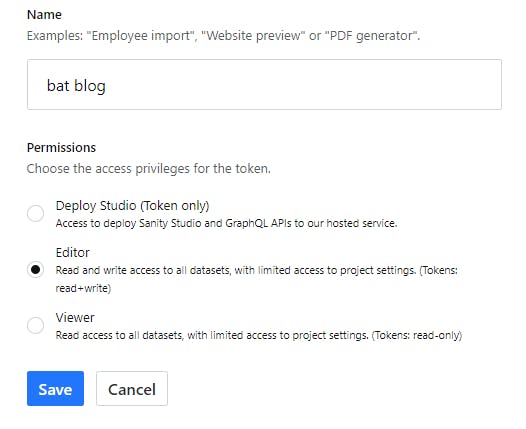
After clicking on save, you're going to be shown your token. Make sure to copy and keep it private.
Add the token to your .env.local:
// Inside .env.local

SANITY_API_TOKEN=
After changing anything in .env.local you have to shut and restart your server:
npm run devCreating the API allowed us to interact with the database securely, this is how it would look eventually in createComment.ts:
// Inside createComment.ts

import type { NextApiRequest, NextApiResponse } from "next";
import sanityClient from "@sanity/client";

const config = {
 dataset: process.env.NEXT_PUBLIC_SANITY_DATASET,
 projectId: process.env.NEXT_PUBLIC_SANITY_PROJECT_ID,
 useCdn: process.env.NODE_ENV === "production",
 token: process.env.SANITY_API_TOKEN,
};

const client = sanityClient(config);

export default async function createComment(
 req: NextApiRequest,
 res: NextApiResponse
) {
   // De-structuring the form's fields
   const {_id, name, email, comment} = JSON.parse(req.body);
   try{
       // Creating a document in sanity studio CMS for Comments with creating a schema for it
       await client.create({
           _type: 'comment',
           post:{
               _type: 'reference',
               _ref: _id
           },
           name,
           email,
           comment
       })
   }
   catch(err){
       return  res.status(500).json({message:'could not submit comment', err})
   }
   console.log("comment submitted")
   return  res.status(200).json({message:'comment submitted'})

}
Now if we were to go to the form and submit a comment we should be able to get "comment submitted" on the terminal, but still, we can't see the comment in sanity studio. That's because we have to update our schema, by going to the sanity project inside your text editor and adding a new file comment.js with the following code:
// Inside comment.js

export default {
 name: "comment",
 type: "document",
 title: "Comment",
 fields: [
   {
     name: "name",
     type: "string",
   },
   {
// To make sure only comments that are approved by the author would show on the blog post
     name: "approved",
     title: "Approved",
     type: "boolean",
     description: "comments won't show on the site without approval",
   },
   {
     name: "email",
     type: "string",
   },
   {
     name: "comment",
     type: "text",
   },
   {
     name: "post",
     type: "reference",
     to: [{ type: "post" }],
   },
 ],
};
Go to schema.js and import comment.js:
// Inside schema.js

import createSchema from 'part:@sanity/base/schema-creator'
import schemaTypes from 'all:part:@sanity/base/schema-type'

import blockContent from './blockContent'
import category from './category'
import post from './post'
import author from './author'
import comment from './comment';

export default createSchema({
name: 'default',
types: schemaTypes.concat([
  post,
  author,
  category,
  blockContent,
  comment,
]),
})
This would allow us to see the newly-created schema for comments with the comments that were added in sanity studio:
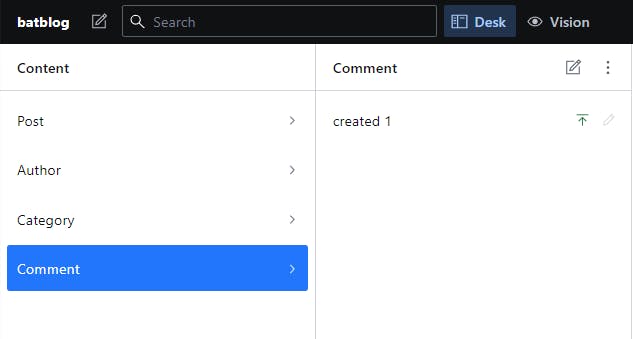
Add this to show a message to the user when their comment has been submitted.
// Inside [slug].tsx:

function Post({ post }: Props) {
// Set the initial state to false
const [submitted, setSubmitted] = useState(false)
const {register, handleSubmit, formState: {errors},}= useForm<IFormInput>();

const onSubmit: SubmitHandler<IFormInput> = async (data) => {
  await fetch('/api/createComment', {
    method:'POST',
    body:JSON.stringify(data)
  }).then(()=> {
  // After submitting the form --> true
    setSubmitted(true)
  }).catch((err) => {
  // If there was an error when submitting the form --> true
    setSubmitted(false)
  })
}
}
For extra measures, go to the form and add this conditional statement which means that if the form is submitted, then display this massage, else render the form:
  // Inside [slug].tsx:

{submitted ? (
        <div className="flex flex-col max-w-2xl px-10 py-10 mx-auto my-10 text-white bg-yellow-500">
          <h3 className="text-3xl font-bold">
            Your comment has been submitted!
          </h3>
          <p> Once it has been approved, it will appear below</p>
        </div>
      ) : (
        <form
          onSubmit={handleSubmit(onSubmit)}
          className="flex flex-col max-w-2xl p-5 mx-auto mb-10"
        >
          <h3 className="text-sm text-yellow-500">Enjoyed this article?</h3>
          <h4 className="text-3xl font-bold">Leave a comment below!</h4>
          <hr className="py-3 mt-2" />

          <input
            {...register("_id")}
            type="hidden"
            name="_id"
            value={post._id}
          />

          <label className="block mb-5">
            <span className="text-gray-700"> Name </span>
            <input
              {...register("name", { required: true })}
              className="block w-full px-3 py-2 mt-1 border rounded shadow outline-none form-input ring-yellow-500 focus:ring"
              placeholder="bat"
              type="text"
            />
          </label>
          <label className="block mb-5">
            <span className="text-gray-700"> Email </span>
            <input
              {...register("email", { required: true })}
              className="block w-full px-3 py-2 mt-1 border rounded shadow outline-none form-input ring-yellow-500 focus:ring"
              placeholder="bat"
              type="email"
            />
          </label>
          <label className="block mb-5">
            <span className="text-gray-700"> Comment </span>
            <textarea
              {...register("comment", { required: true })}
              className="block w-full px-3 py-2 mt-1 border rounded shadow outline-none form-textarea ring-yellow-500 focus:ring"
              placeholder="bat"
              rows={8}
            />
          </label>

          {/* errors will return when field validation fails */}
          <div className="flex flex-col p-5">
            {errors.name && (
              <span className="text-red-500"> The Name is required</span>
            )}
            {errors.email && (
              <span className="text-red-500"> The Email is required</span>
            )}
            {errors.comment && (
              <span className="text-red-500"> The Comment is required</span>
            )}
          </div>
          <input
            type="submit"
            className="px-4 py-2 font-bold text-white bg-yellow-500 rounded shadow cursor-pointer hover:bg-yellow-400 focus:shadow-outline focus:outline-none"
          />
        </form>
      )}
What's left to do now, is to show the comments on the post's page, and this could easily be done by enhancing the queries we used with sanity studio vision to include the comments:
Noting that you won't be able to see the comments if you didn't approve them from inside the comment schema:

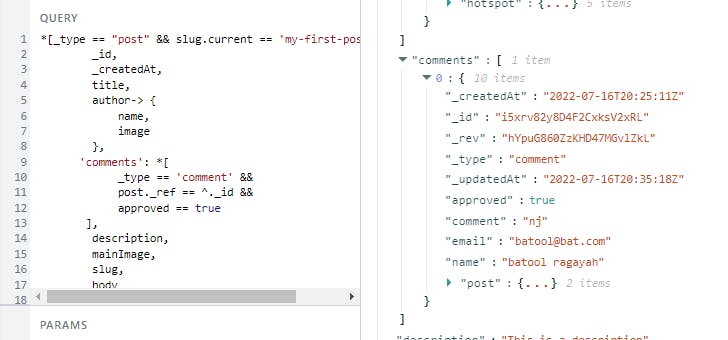
Now use this query to render the comments:
// Inside "index.tsx"

export const getServerSideProps = async () => {
const query = `*[_type == "post"] {
  _id,
  title,
  author-> {
   name,
   image
  },
// This will pull the comments to the frontend
  'comments': *[
    _type == 'comment' &&
    post._ref == ^._id &&
    approved == true
],
  description,
  mainImage,
  slug
}`;
const posts = await sanityClient.fetch(query);
return {
  props: {
    posts,
  },
};
};
Enhance the post's type definition by going to typings.d.ts:
// Inside typings.d.ts

export interface Post {
_id: string;
_createdAt: string;
title: string;
author: {
  name: string;
  image: string;
};
comments: Comment[];
description: string;
mainImage: {
  asset: {
    url: string;
  };
};
slug: {
  current: string;
};
body: [object];
}

export interface Comment {
approved: boolean;
comment: string;
email: string;
name: string;
post: {
  _ref: string;
  _type: string;
};
_id: string;
_createdAt: string;
_rev: string;
_type: string;
_updatedAt: string;
}
Then in [slug].tsx add this below the form tag:
// Inside [slug].tsx

{/* Comment */}
    <div className='flex flex-col max-w-2xl p-10 mx-auto my-10 rounded-lg shadow-lg shadow-black '>
        <h3 className='pb-2 text-3xl'>Comments</h3>
        <hr className='pb-2' />

       {post.comments.map((comment) =>(
         <div key={comment._id}>
           <p>
           <span className='text-gray-500'> {comment.name} : </span>  {comment.comment}
           </p>
         </div>
       ))}

    </div>
Deploying
Sanity Studio
Firstly; cd into the sanity project on your terminal and run:
sanity deploy
You might be asked to login on the terminal:
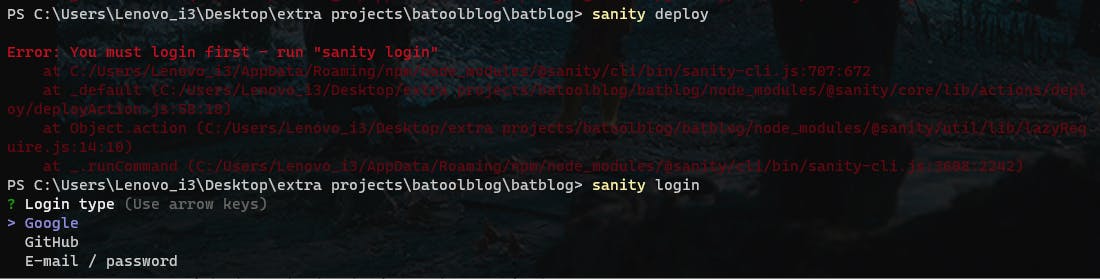
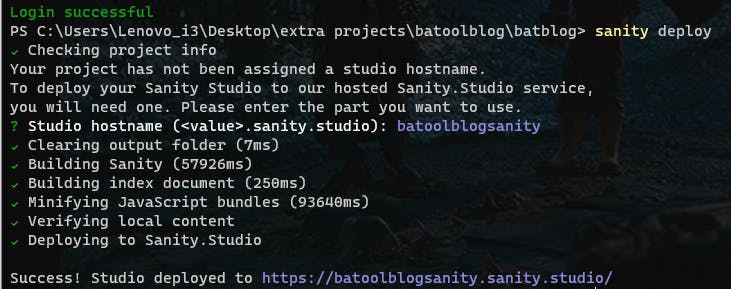
So log in and re-run sanity deploy, and choose a host name. After it's done building you'll be taken to the deployed sanity studio where it will be synchronized with the one on your local host from before:
Next.JS App
Go to your vercel dashboard and click on +New Project --> Import Git Repository.
Click on the environment variables to add what you have in .env.local then click on Depoly.
And right about now you should get this lovely message and visit your deployed website:

Noting that if you wish to add changes and only test them out --> create new branches and push to them. Don't push to the main unless you want the changes to be on production.